TLDR: I made my own hand-sewn desk mat to pair with the GMK Indigo keycap set. I kind of winged it from start to finish and am thrilled by how it turned out.
I fell in love with GMK Indigo when I first saw the set back in early 2022. Taking inspiration from Japan’s denim fashion culture and art of sashiko mending, the set’s colours and design spoke to both my love of denim and traditional Japanese craftsmanship: simple, layered, timeless, artistic, and durable. The keycap set’s novelties evoked memories—not my own, yet intimately familiar—of many dedicated hours spent mending worn fabrics, bringing them back to life through countless stitches, weaving history and meaning throughout. Because of this, I knew right away that I wanted to make my own desk mat to go with the set.
The keycaps arrived in late 2023 and I spent the first couple of months sourcing my fabrics. I didn’t have much in my possession to work with and purchasing new fabric would not be in keeping with the intention behind the project of using worn and upcycled materials. So, I foraged through my mother’s fabric stash of offcuts collected over the years decades, and searched in thrift stores through piles of children’s clothing (because they’re much smaller and I wouldn’t have to feel so bad about cutting them up), looking for items that had just the right colour-matched shades and hues of blues to create my Indigo-inspired mat.
Around that same time I was also learning about the Japanese practices of boro and sashiko. That quickly lead the YouTube algorithm to introduce me to the practice of slow stitch, to which I was immediately and utterly drawn.
In January 2024, when I had enough fabrics to work with, I brought them all together to explore layout options. I eliminated the light colours and fabrics that wouldn’t work, focused on the darker navies, and proceeded to move the pieces around to see how I might arrange them. It was all random at first, but then I brought that large triangular piece to the front, saw a mountain, and it hit me, Mount Fuji! I took the idea and ran with it, added a sun/moon, a cloud, and a few more little mountains. I liked where this was going!


Once I was happy with the scene, the next step was to roughly baste all the pieces down to the backing, and with that done, it was time to stitch and secure them into place!

Then it was somehow and suddenly September. I slowly managed to stitch (that’s a lot of s-words) the collage pieces down and remove most of the basting stitches save for around the edges. It was at this time that I also decided, as though things weren’t already hard enough and taking too long, that I was going to make my desk mat double-sided! Feeling creative, and inspired by a whole bunch of slow stitch videos on YouTube (I highly recommend giving Kathryn’s channel, @k3n.clothtales, a visit), I played around with making three square slow stitch collages that I could attach to the back side of the mat. Actually, I made four squares, but one of them doesn’t work as part of the series so I pretend it doesn’t exist. I didn’t know how or when I was going to attach them, or how I was going to attach the back itself, but those were problems for another day.

The squares were so much fun to work on and they were small enough that I didn’t feel too overwhelmed with making them. Unfortunately, I didn’t document any of my process. I just cut up pieces of scrap fabric, laid them down in a pleasing enough fashion, and played with the stitching on top.
By this point I had yet to start putting any decorative stitching on the mat itself, I found this step somewhat daunting. Perhaps the three squares were my way of creating a distraction from the sizeable task that lay ahead of me, or perhaps that little side quest was exactly what I needed to get myself into the flow and prepare for what was to come. Either way, eventually, without much thought, I chose a floss colour and started on a little corner of the mat, then moved on to another. Then life happened and I didn’t return to the project for another couple of months.

I picked things up again last month in early February. A few days later, fortuitously, a friend reached out and asked if I was interested in doing “stitching hours” together. I leapt at the chance. This helped enormously with my momentum and excitement to keep working on the project. The following two weeks passed by in a blur. Most days were spent stitching for an hour or two. On occasion, I was sat down hunched over the mat for most of the day, lost in the rhythm of stitching row after row, section after section. I could have kept going. I could have kept adding more layers, more stitches, more complexity. But at some point I stepped back from the mat, took in my progress as a whole, and was very pleased with where things were.
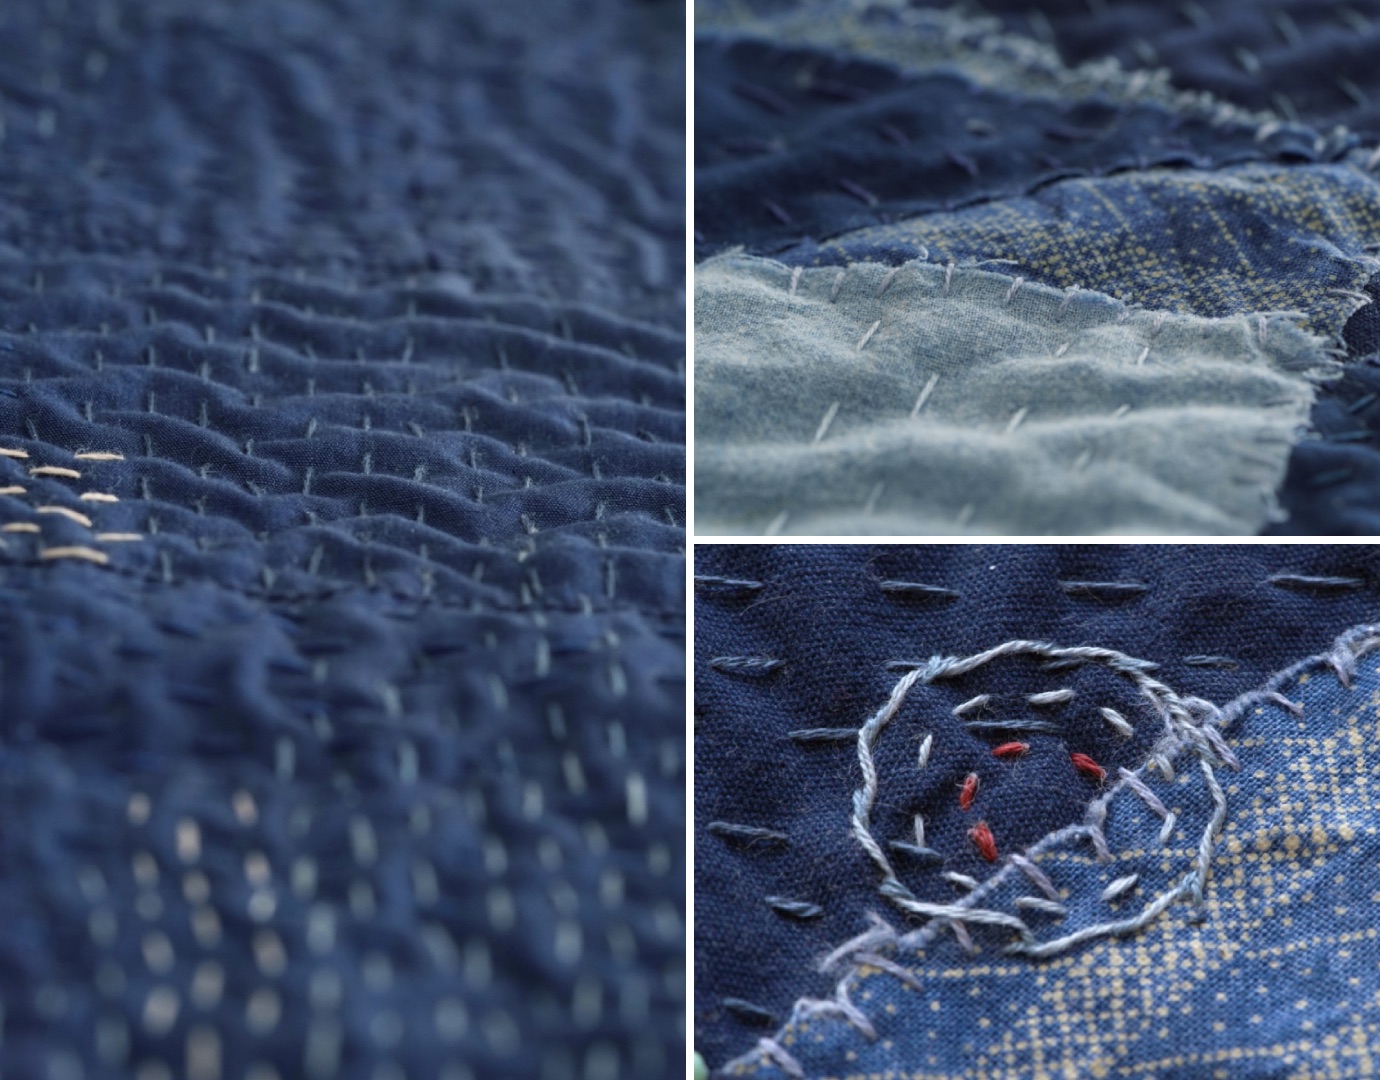
This decorative stitching part of the process was wondrously full of little moments of curiosity and discovery. There are always little questions and mini-choices to be made as one stitches along: “Do I stop here or do I continue on this line for another stitch or two? Should I make such a leap with my needle, or should I tie off and start again in a different spot? What colour do I transition to over here and what direction do I want to stitch in? That stitch was really wonky, but is it charmingly wonky or distractingly askew?” And so on. And as nervous as I was to begin the decorative stitching at first, I absolutely loved seeing the texture and depth being added as I went along. The world melts away in those moments, between one stitch to the next, my mind and body engaged fully in the process and joy of creative exploration, knowing that no mistakes can be made that cannot be unmade, and, given the hand-made nature of this work, trusting that imperfections were not only acceptable, but crucial to however the project was going to turn out.

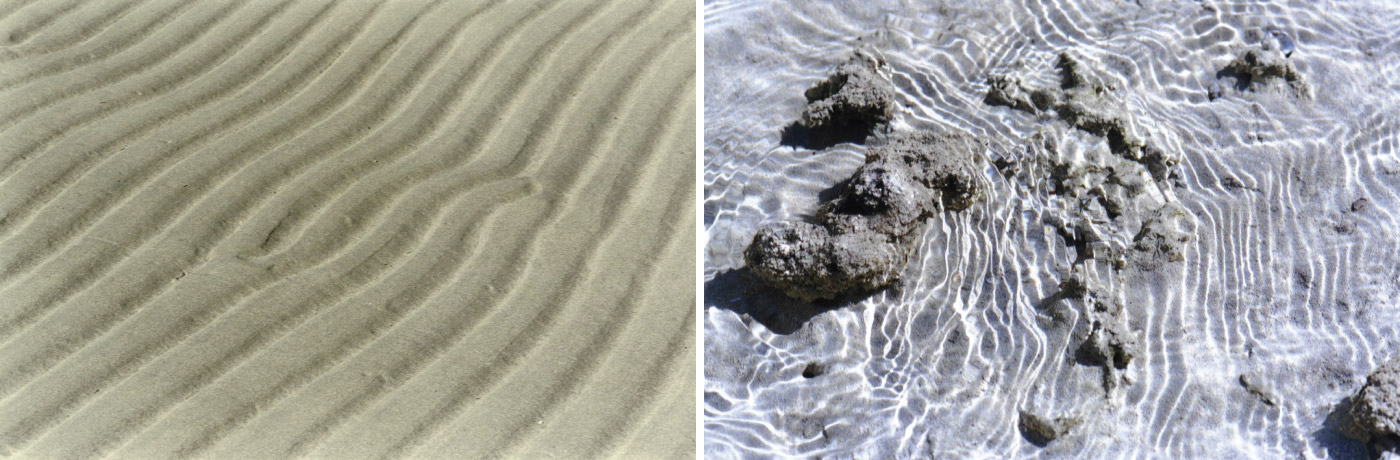
I adore the buckling in the fabric that happens due to tension inconsistencies…I find those ripples between the rows of thread absolutely captivating, alluding to comfort and warmth, and evoking, for me, a sense of generational and cultural wisdom. I also grew up around the ocean, and I see the sand waves in those tactile ripples, I hear them saying, “We were patiently and steadily shaped, purposefully crafted by hand, pass after pass, with love and dedication.”
With the decorative stitches done, the next challenge was attaching the back piece, which I still wasn’t certain how to do. I thought about machine sewing the front and back right-sides-together and flipping the mat inside out, therefore eliminating the need for edge binding. But I still needed to crop the mat to its final dimensions and that’s when I realized that my measurements were not as flexible as I previously thought…the seam allowance needed for this option would mean cropping too much from the image. Pivoting, I chose instead to extend the backing fabric by about an inch all around the mat so that I could do a double fold over to the front to create the binding.
Let me tell you, this part took forever. I couldn’t easily shift the top piece around to centre it on the back fabric to trim because the batting would cling to the fabric as soon as I put it down…imagine having to reposition peel-and-stick wallpaper by having to take it off entirely each time. Then I kept noticing how out of square my mat was, which didn’t make sense because I was using the proper tools to ensure squareness, but I would line up the square sides, trim the lopsided excess, only to have the issue present itself all over again elsewhere. It frustrated me greatly until I decided that things were square enough and I couldn’t afford to keep trimming down any more of my piece (and peace). I folded over the binding and pinned it all in place.

As for securing the back, I didn’t want to quilt all three layers together because I didn’t want the stitches from the back to show on the front. I decided that sewing the back to the batting, just as I did on the front, would suffice. I explored my options, first by doing straight running stitches lengthwise along the back, but after doing a few rows, I didn’t like the look of it and took out the stitches. Then I tried doing cross stitches in a loose grid pattern and ended up sticking with that. I stitched the back using regular Gütermann polyester sewing thread because I had already pinned the edge binding closed (not undoing that, thank you), and, being that it’s finer and smoother than embroidery floss, the thread knots would be small enough to pull through the fabric from the outside in to hide between the layers.

With the back piece secured, I sewed the binding in place with a basic hemming stitch, taking the pins out as I went along. I was planning on using my sewing machine to add a topstitch around the border for extra security and to give the mat a more “finished” look, but when I was done with hemming the binding, I realized I didn’t really need or want to do that.
As a final touch, I added a little signature label to the pocket. The pocket, by the way, makes me smile to no end. The mat’s final size is about 32.5″ x 13.5″ (83cm x 34cm).

If you’re wondering about the three slow stitch squares I made to add to the back, well, when I was done, I looked at my finished mat and loved it so much that I knew, whether hanging on a wall or sitting on my desk under a keyboard, I’d never want to turn it over. So, I set them aside to either use in a different project or perhaps frame for display.
And now that I’ve finished making the mat, I must say that I am proud of this accomplishment (though it feels uncomfortable to self-praise), considering that I was basically figuring out the steps as I went along and it took me over a year to complete. I had no idea what I was going to do for this mat or how it was going to take shape when I initially decided I wanted to make one, having never made anything like it before. Even with whatever research I had done, I had no clear vision (thank you, aphantasia) to guide me. I think I just had an out-of-focus image in my mind of a “blueish mat that looked cohesive in an abstract sort of way”. I found this to be both worrying and freeing…but thankfully, I experienced more of the latter.
The practice of slow stitch is all about letting go of expectation and focusing one’s efforts and joys on the process of making. And though I normally struggle greatly with not knowing where I’m heading, this project surprised me with how readily I was able to embrace the mystery and discovery inherent to the process. That doesn’t mean I didn’t get nervous at times with whatever choices I had to make, but I allowed myself to reach for the seam ripper whenever stitches were too “off” to accept, and that helped a great deal with keeping myself moving towards the finish line.
On a related note, I wish to also share one of the biggest lessons I learned from this project: I used cotton batting as a backing for the top layer—this was a mistake. The thread kept pulling out batting fibres with almost every stitch I took, and while I tried to figure out ways to minimize this happening, it often felt like a futile effort. It all worked out in the end, but going forward, I’ll rely on plain cotton or linen fabric, such as used sheets or tea towels, instead. I do like the padding that the batting provides, however, but I’ll have to figure out a different approach. [Edit: I think using cotton fleece, sandwiched between the layers, could work to provide that bit of padding without being a nuisance to work with.]
Next up: making the matching USB cable and building the keyboard to bring it all together. And after that…a GMK Matcha mat, perhaps? But I’m getting ahead of myself.
At last, here it is, the full view of my completed GMK Indigo-inspired handmade desk mat!
P.S. It was a challenge taking consistently decent photographs while documenting this project. Lighting and colours vary widely. I did my best.
