My most recent DIY project was an exhausting and emotional roller-coaster ride of trial and error that resulted in a very pitifully wonky, but adequately (and dare I say, somewhat adorably) functional pair of slanted legs meant to lift and support my new MIDI controller/piano when placed on my desk.
If you care not about the backstory and understanding what a MIDI controller is, feel free to skip through the sections below.
Backstory
It all started in late February when I was doing research on which MIDI controller to purchase—actually, no, it started several months before that, in late 2025, when a dear friend of mine asked me to compose some music for a stage play that she was going to write and perform in the summer. I had been wanting to venture into learning digital music production for a while but would usually get too overwhelmed with all the research involved any time I approached the subject…so when my friend made that request of me, being a “real” and worthy reason to finally get into it, I saw it as the perfect opportunity to kick myself into gear.
Understanding the Tech
And what’s a MIDI controller, you ask? MIDI stands for Musical Instrument Digital Interface, and it’s a way to turn musical information into digital data. So, a MIDI controller is basically an input device or musical “instrument” that creates a bridge between the user and the computer, sending digital data from the device to the computer that translates to sound and expression. A MIDI controller does not usually create sound itself; instead, it communicates the digital information of what is being played on the device to the computer through software that is able to interpret that data and express it into sound.
This software is often referred to as a DAW, which is a Digital Audio Workstation. Basically, a program or app through which digital audio can be recorded and edited. Think Photoshop, but for audio instead of image files.
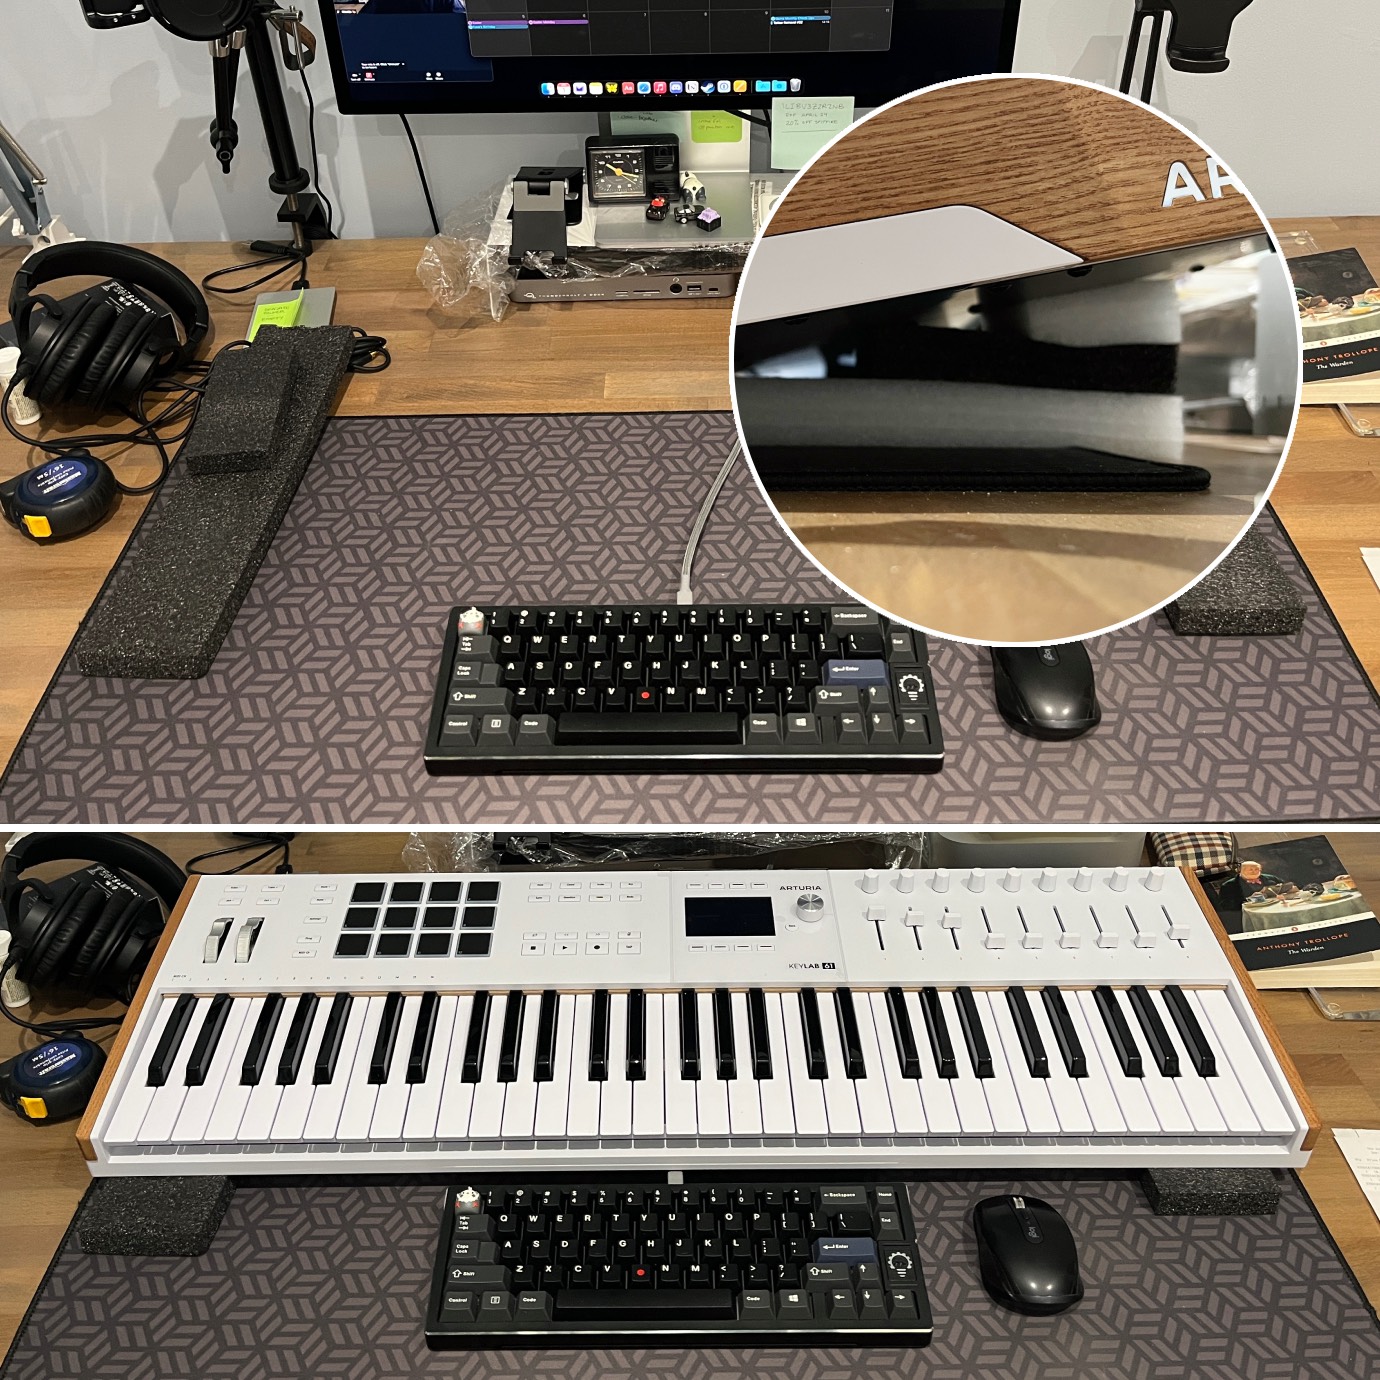
My main 88-key digital piano can function as a MIDI controller, but I have no room for it in my office, and it’s firmly situated in my living room where I want it to happily remain. So, I made the decision to purchase a separate MIDI controller to place in my office for my digital music production explorations.
Decisions, Decisions
But which brand and what size of MIDI controller do I want? Or, more accurately, what size piano can my office accommodate? Ideally, it would be something that I could fit on my desk in front of me so that I didn’t have to keep turning back and forth between playing on the MIDI piano and using my computer keyboard and mouse.
After a couple of weeks of research and reflection, with the effects of decision fatigue starting to take their toll, I concluded that, for the time being, I should get something that wouldn’t be too overwhelming to use that will help me interact with my DAW and navigate my way around the software, which I saw as a daunting task in and of itself.
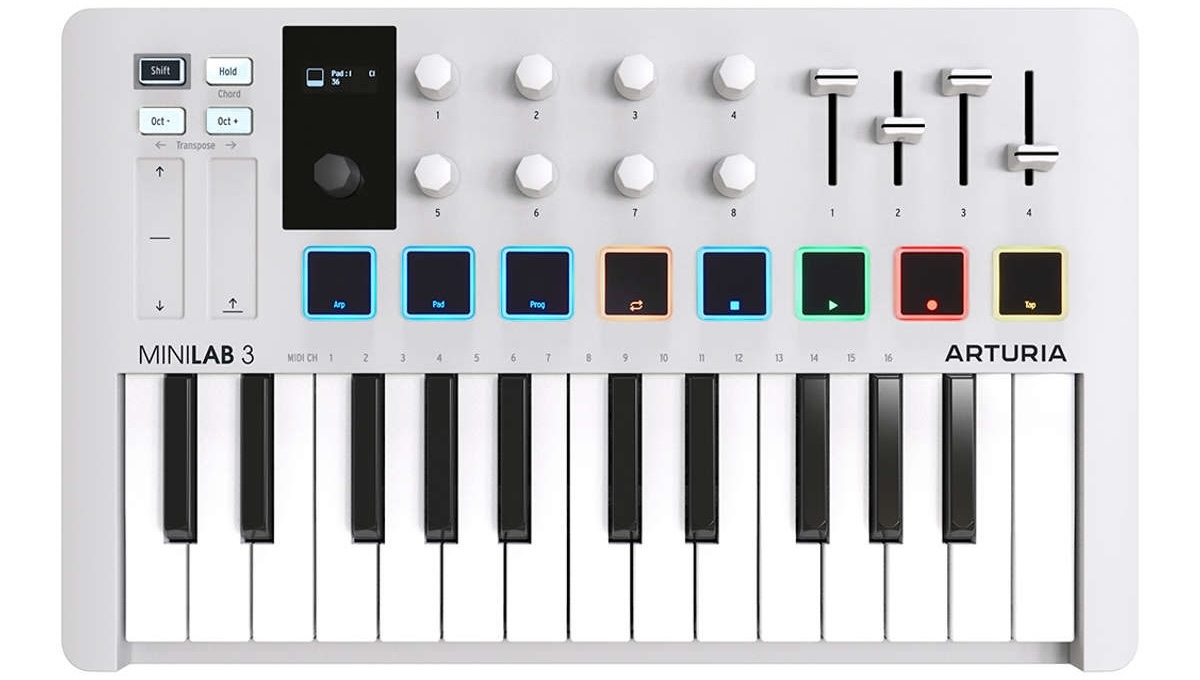
So, I ordered myself the Arturia MiniLab 3, an affordable and compact 25-key MIDI controller, that could get me started with learning Logic Pro (my DAW of choice). I figured I’d worry about getting something more substantial later, when my skills grew to require it.
Well, I received the MiniLab and played around with it, but quickly saw that it would not do. For the type of music I wish to create, and as a piano player, I’d need something bigger, 25 keys was too restrictive. Luckily, the unit I received happened to also have a faulty key, so I was going to have to return it anyway.
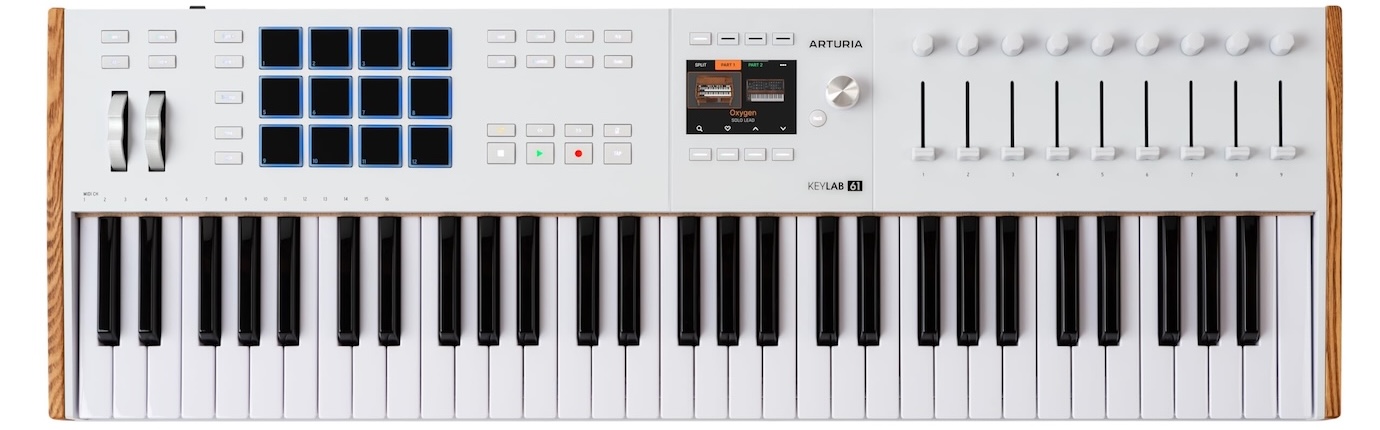
A week went by during which I was right back where I’d started, trying to decide on which controller to get, weighing my options regarding size, features, and price. I also went to the music store again to try out what they had in person. Eventually, I thought the heck with it, I’m going to lean in and order the largest one I liked, the Arturia 61-key KeyLab, that will hopefully serve me for a few years to come.
Another stroke of luck: I happened to be checking my credit card online a few weeks later, and saw that I had accumulated enough cash-back reward points to fully pay for the controller, essentially getting it for “free”!
But when I received it a week later, I admit, my inner Goldilocks came out and was worried that this one was too large! I panicked and stressed about how I was going to fit it on my desk, as it pretty much takes up most of the usable space I have. But I was determined to keep it—this number of keys was perfect and I didn’t want to lose an octave and go down to a 49-key controller.
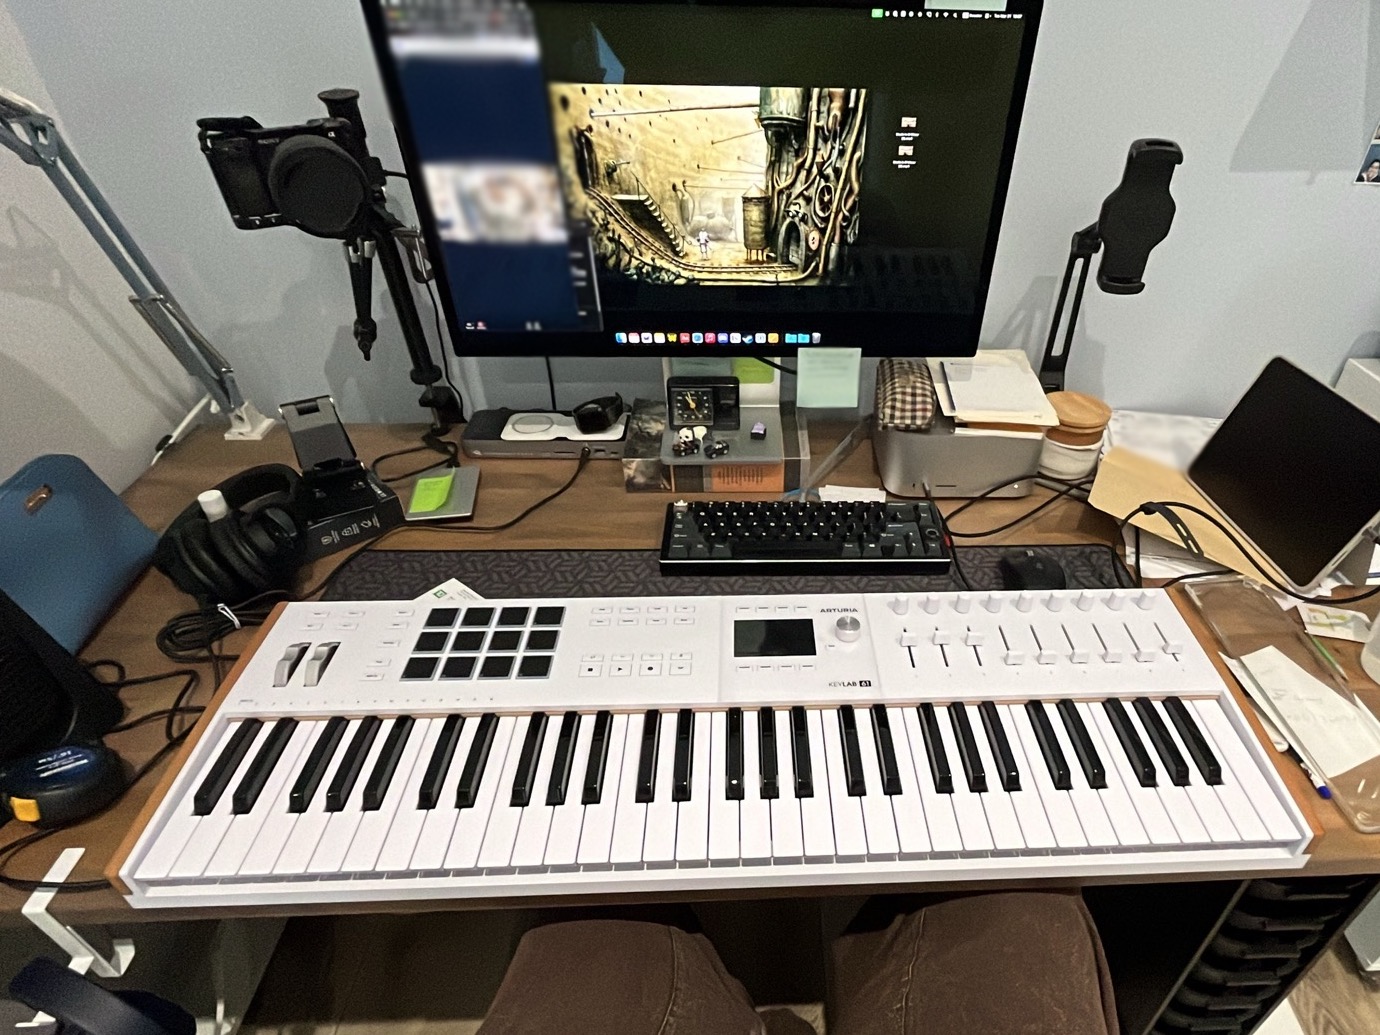
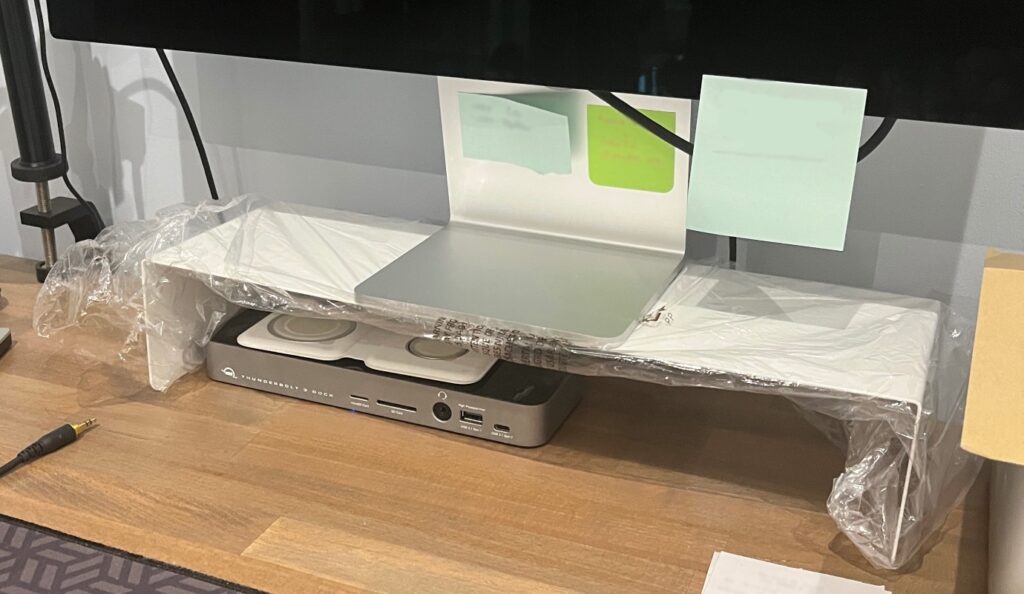
So, the first next step was to make room for it, and with some minor adjustments to the placement of my monitor and nearby accessories, I made things work. I replaced the tome on which my monitor stood (Norton Anthology of American Literature—which was always meant to be a temporary solution for the monitor anyway) with a metal shelf I had lying around that I turned upside down, thereby allowing for items to sit below the monitor and cables to pass through beneath it. I also decluttered my desk a bit.
An aside: Why did I not remove the shelf from its plastic bag?
I then needed to create two work zones, one in which to place my keyboard and mouse, and one in which the MIDI piano could be situated. I wanted the piano further back and the keyboard and mouse closer to me, so this meant having to lift the piano an inch or so from the desk’s surface so that I could pass my keyboard cable under it and also allow for some extra space for my mouse to move around somewhat freely. I also wanted to give the controller a slight tilt for comfort and easier playability.
This is where the DIY project comes in.
Wonky Wood for Wonky Working
First, I experimented. I had some foam packaging pieces that I had saved a few years ago for various uses, and they served perfectly for this operation. I cut some pieces and tried placing them in different configurations to give me the correct height and angle for the controller to sit on.
Honestly, this worked fine initially, but the controller is built like a tank and is quite heavy, and the pads started to flatten a bit under the weight of it after a few days…I needed to come up with something more sturdy.
I looked online for some ready-made stands or pairs of legs but found nothing that would work perfectly. Then I considered having something 3D printed. Again, I found nothing that could work exactly as I needed. So, I sketched up a design myself that my brother could help translate digitally and provide for me a file that I would then print for very little cost at the public library. But my brother was a little busy at the time, and I was impatient.
Then I thought, I’ve got some wood lying around, and I do have the basic tools to attempt an object such as this—not exactly like my sketch, but something basic that would serve just as nicely. I just needed two flat pieces of wood with legs attached at some sort of angle, right? How hard could that be?
Very hard indeed, as I came to learn.
But I didn’t know the challenges then that awaited me, and the following morning, activated by a sudden burst of energy and optimism, I quickly set up a wood-sawing area in my apartment’s hallway.
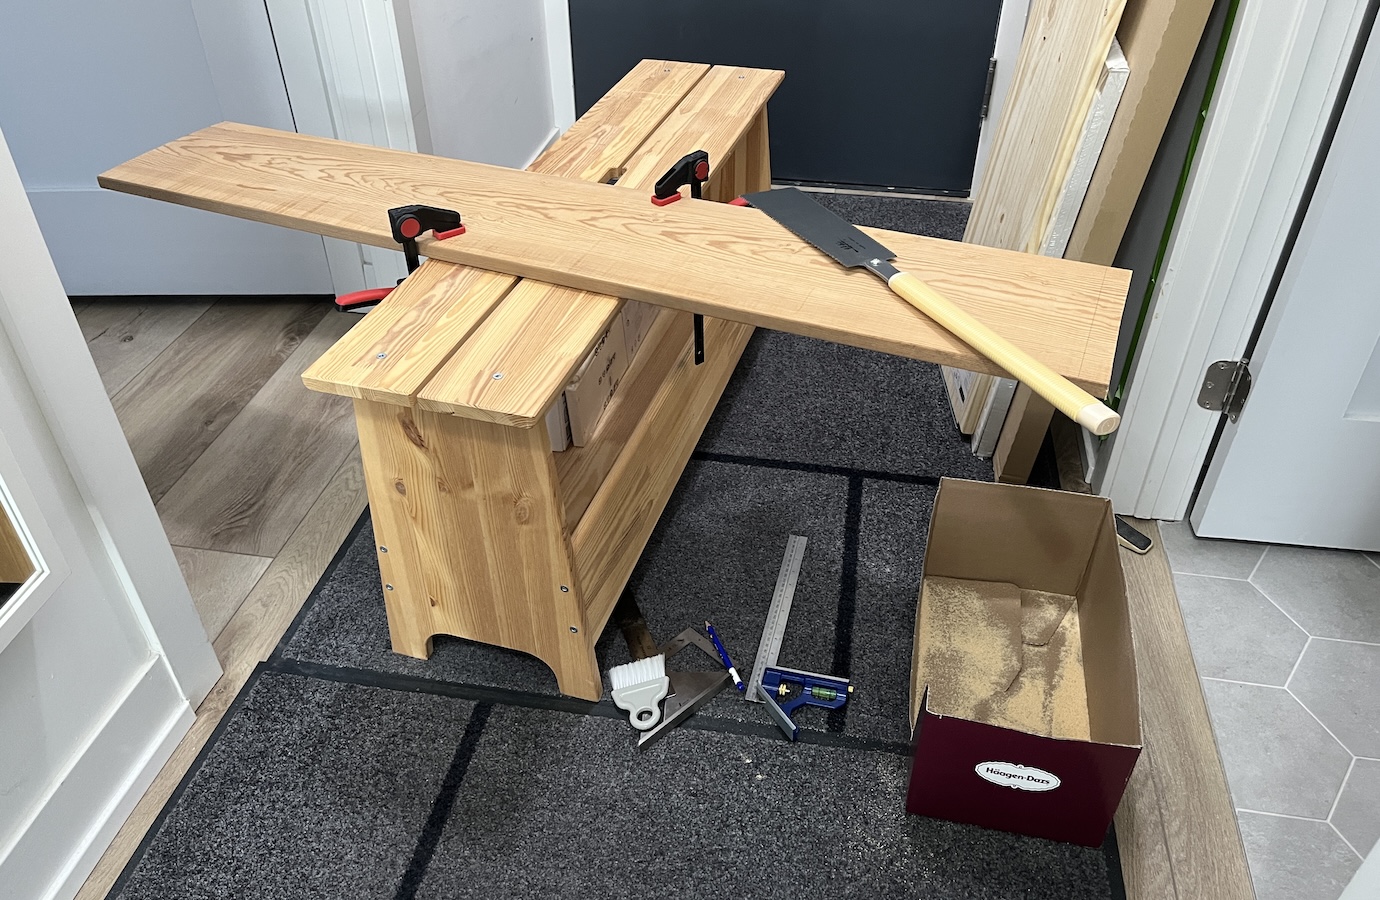
I had a piece of solid pine that I had found discarded in my building’s loading bay a couple of years ago that I took to use as a possible shelf one day…it was apparently destined to have a pair of stands made out of it as well. This piece of wood was also both slightly cupped and twisted, but I, of course, didn’t want to bother with that fact and chose to ignore it (*insert eye roll at myself*).
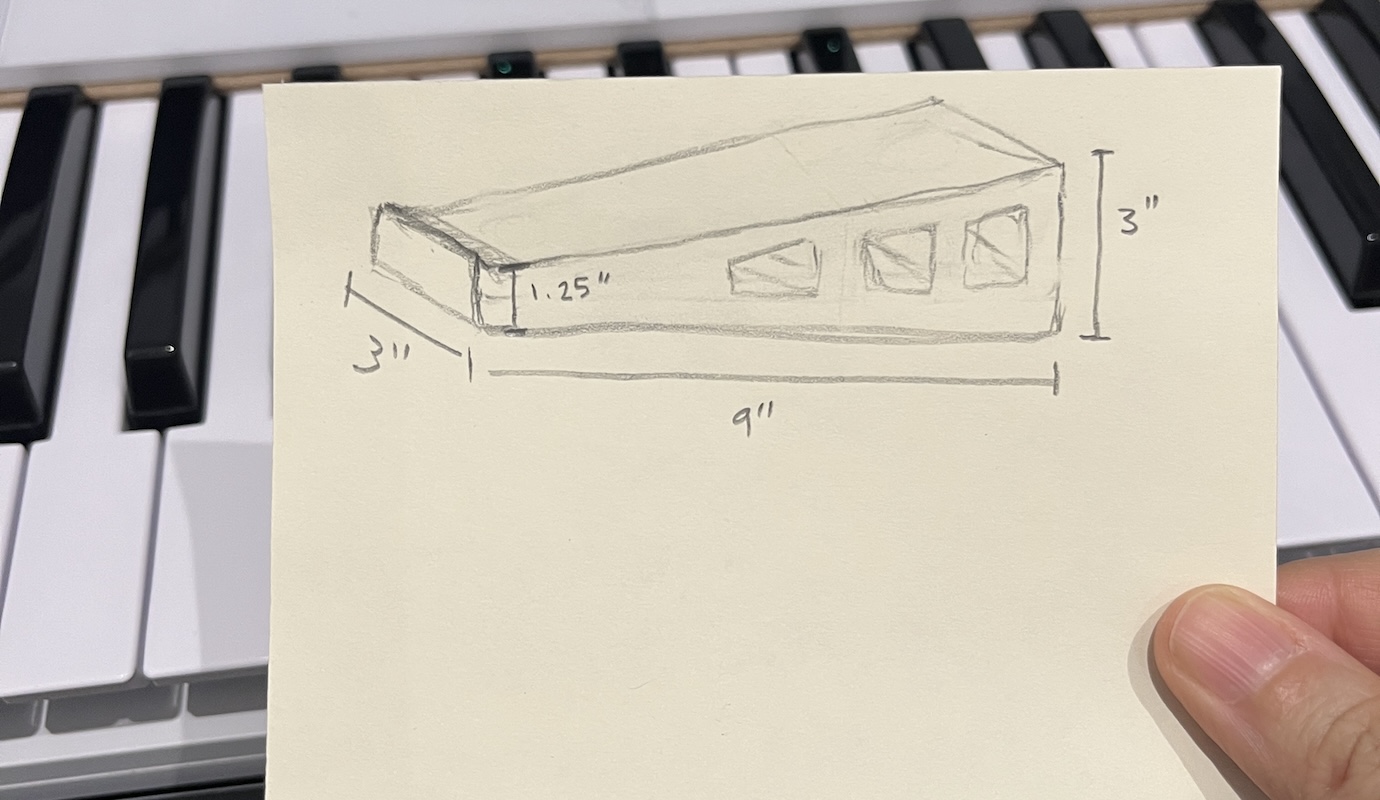
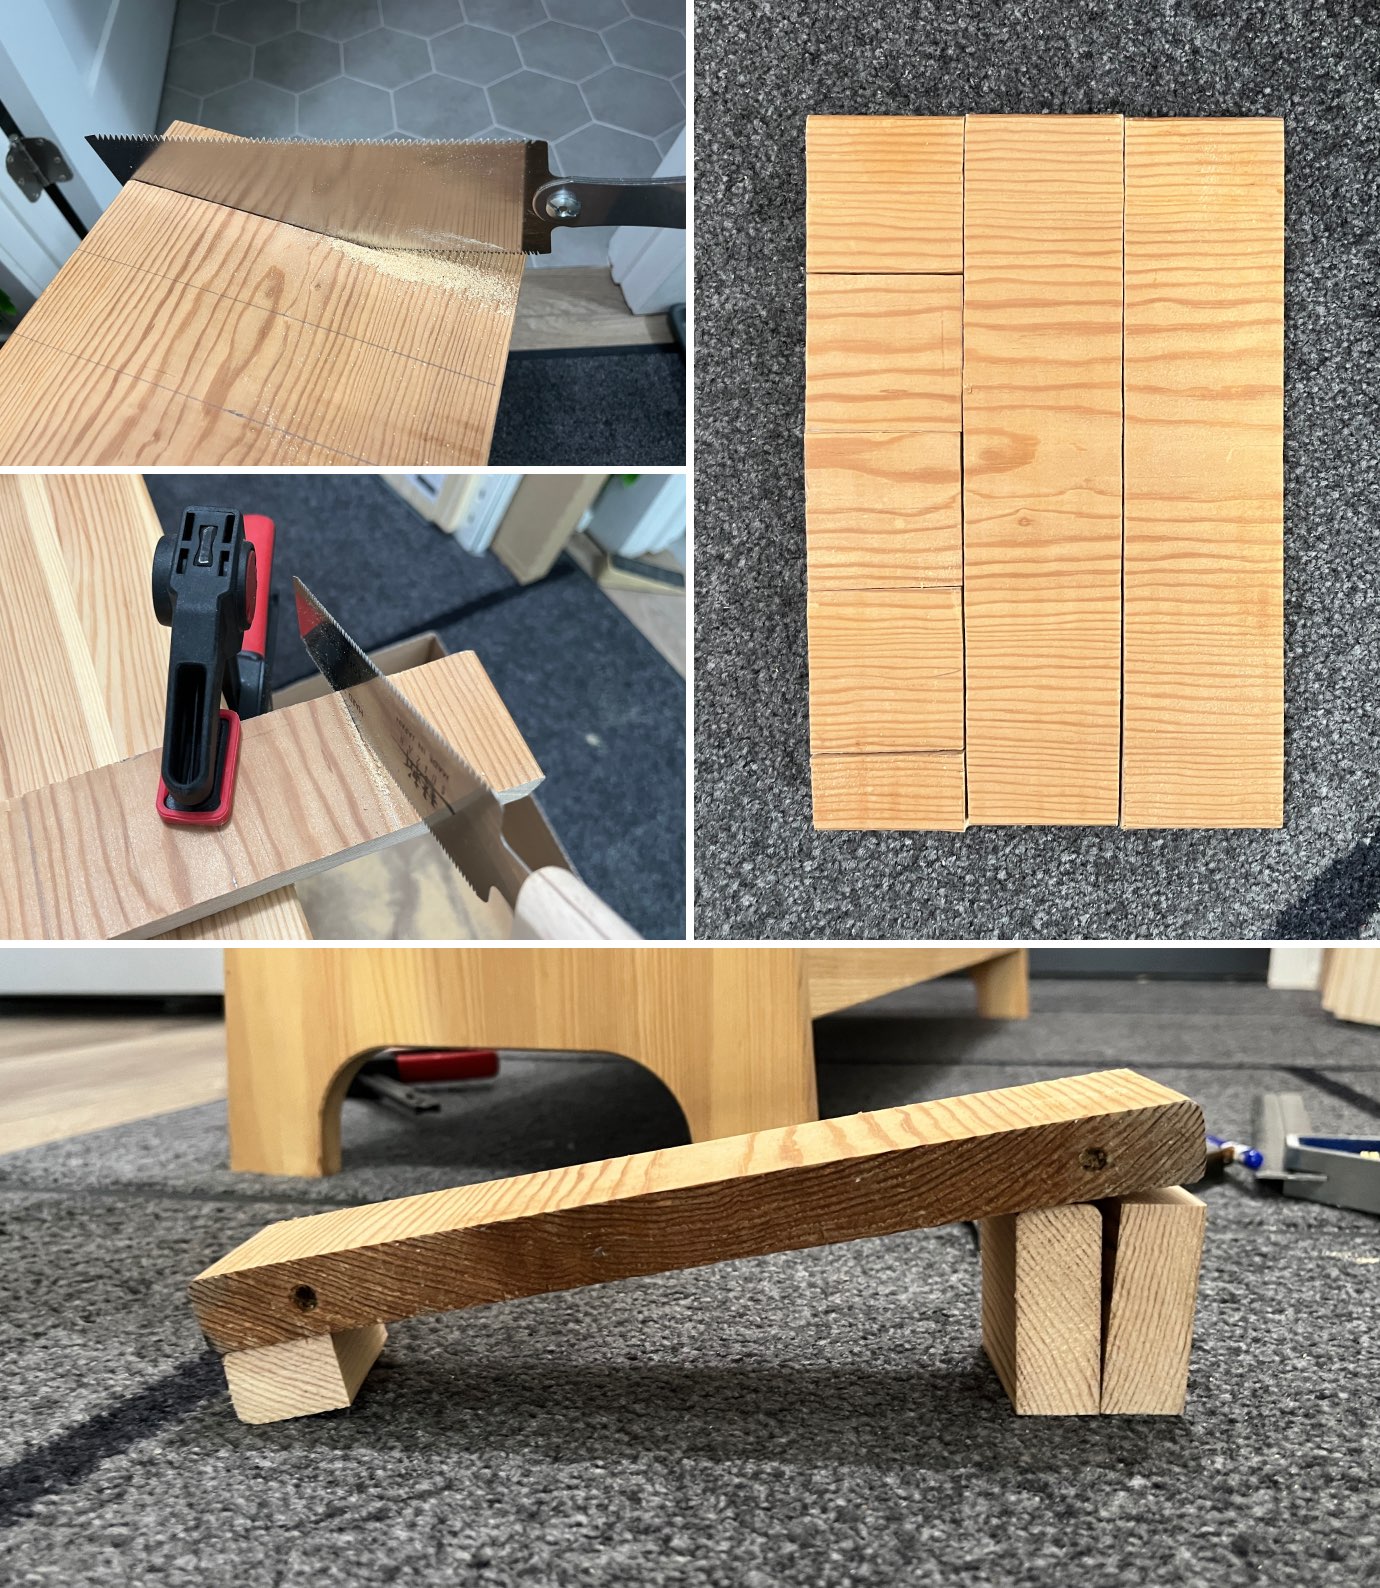
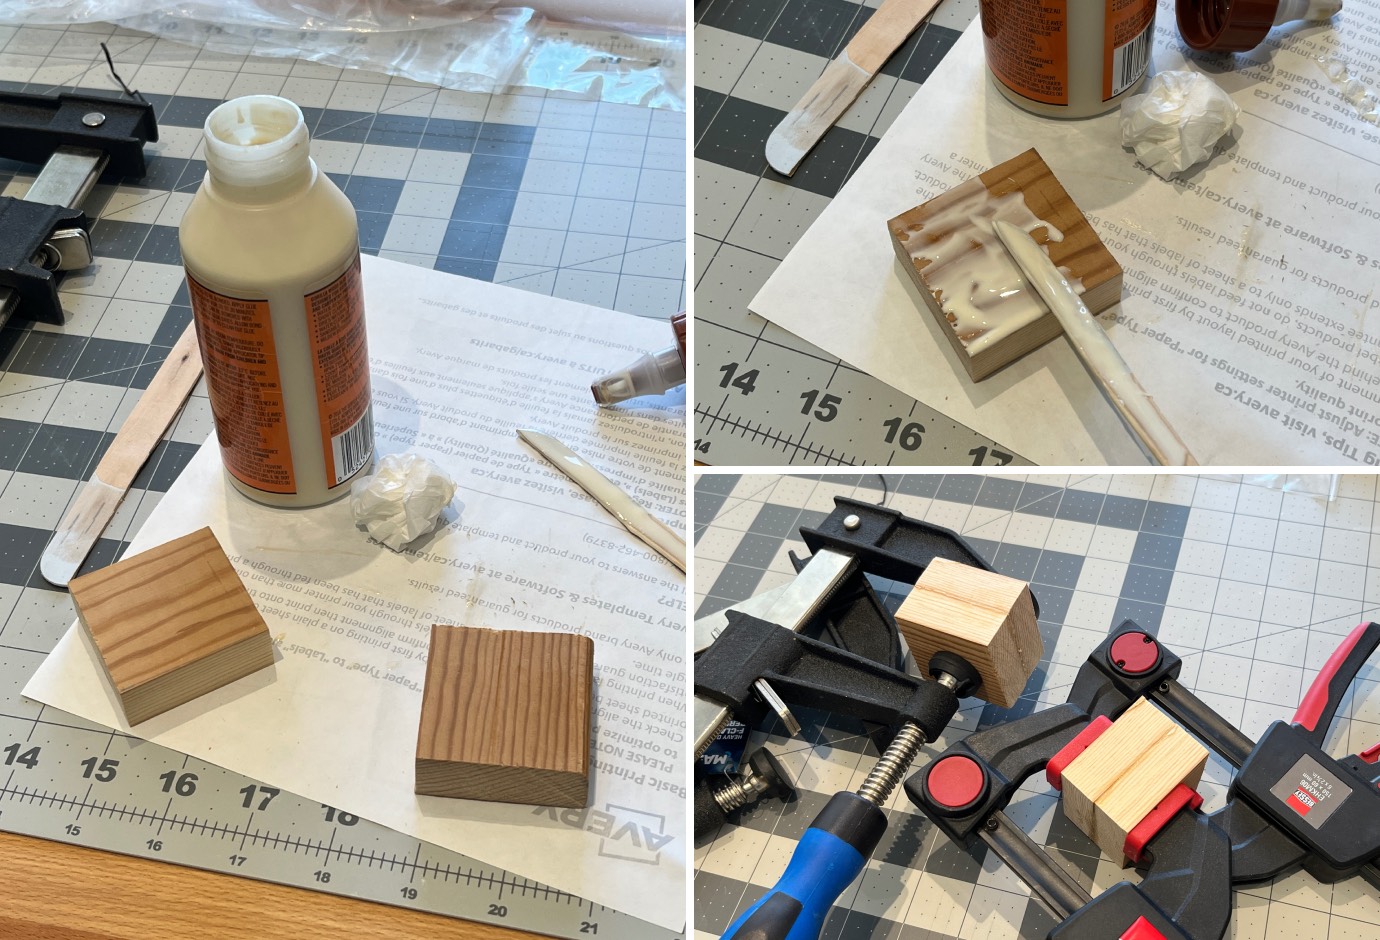
Without much thought or planning, really, and with only a rough idea in my head of what I wanted to achieve, I cut three “straight” pieces measuring roughly 9″ long by 2″ wide, two of which would be used for the stands’ surfaces, and the third to be cut into smaller pieces that I would glue together to form the feet for each stand.
Bottom: General idea for the legs.
Using the four smaller wood blocks I cut out, I started working on the two back feet by glueing two blocks together for each and leaving them clamped for a few hours.
And this is where I realized that things weren’t going to be as easy as I thought.
If the controller were to be stationed flat, that wouldn’t have been a problem, but I wanted it angled. I had hand tools I could put to use: planes, chisels, saws, clamps, rulers…but I had no way of figuring out or measuring angles properly…and I didn’t know how to use my brain for such calculations…I got big fat D’s on my IGCSE Mathematics exams for a reason.
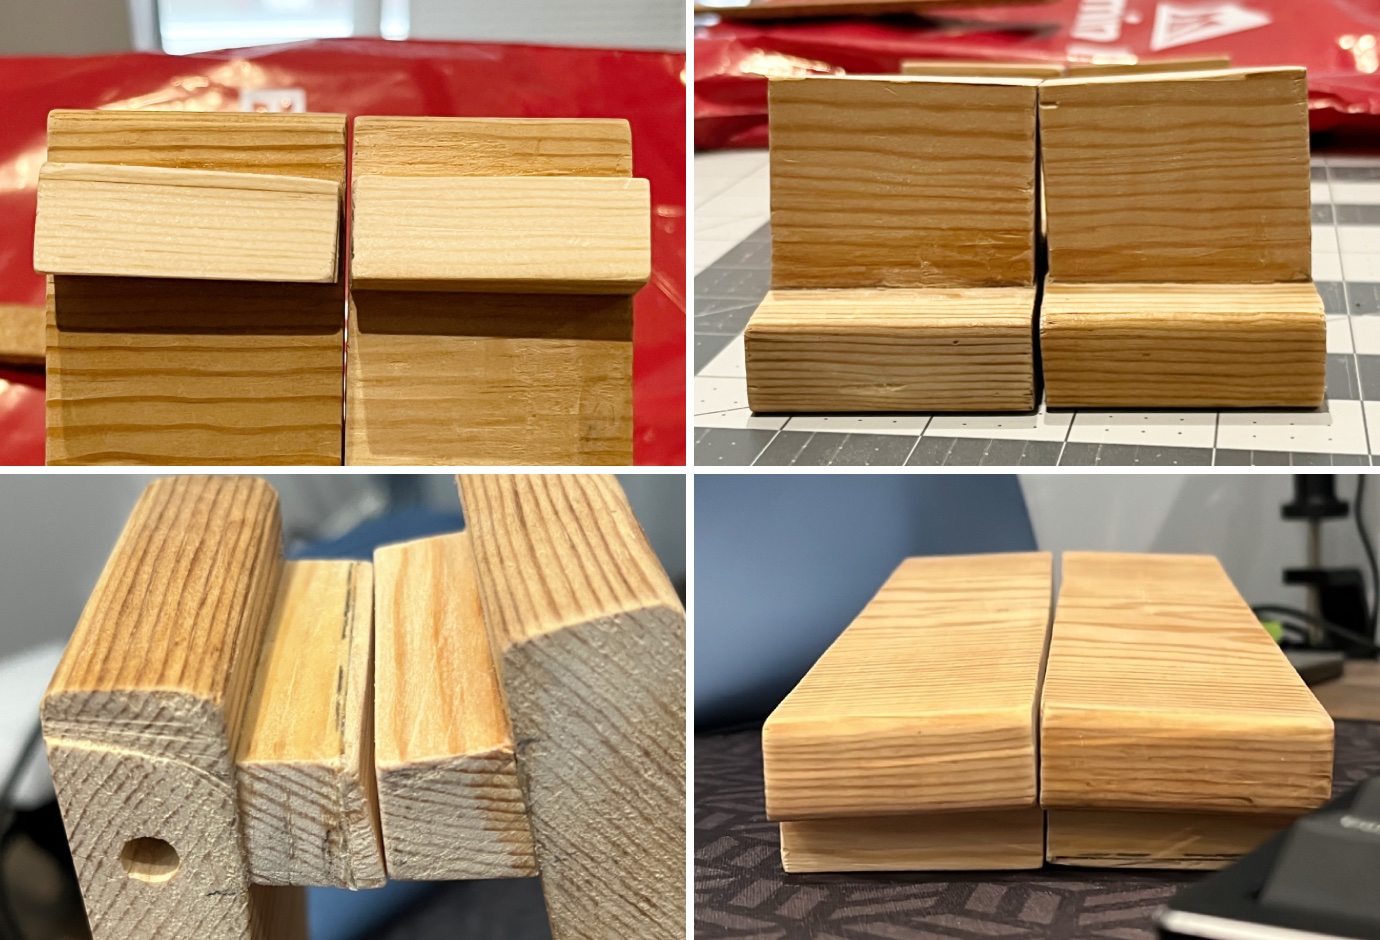
I also needed to figure out the front feet, because I needed the legs to support the controller at least an inch off the desk’s surface. Before I attached each leg surface piece to its feet, I had to figure out at what angle to cut the feet, and that angle gets wider when you move from the front feet to the back.
I could have made a cardboard template and outlined the overall shape and size of the legs and copied those lines onto the pieces to follow. But oh no, that would have been too easy, which means it did not occur to me at all to do that at the time!
At this point, I figured let me go ahead and at least try something. The only way through is forward! I made some rough measurements and, with my hand saws, cut off angled pieces from the back feet. With the pieces I cut from the back feet, I somehow improvised the smaller front feet. I didn’t take many photos during this stage as I was moving along in a haze of denial and panic.
Everything from here on out is a blur. Imagine some kind of cartoon scene where someone is making something and the “camera” zooms in on their focused eyes with furrowed brows, and then zooms back out on their arms moving about determinedly with various tools in hand, and there are whooshes of dust and debris flying out from within a cloud of creative genius, before they emerge triumphant with some amazing product. But in my case it was more like being hunched over in the epicentre of pitiful creative assembly, labouring over these pieces with sweat running under my boobs down my back and frequent pauses for considering my next steps with much concern and worry. I was suspended in some time bubble in which only stress and confusion existed.
You can be absolutely sure that no cuts were remotely clean or straight throughout this whole process, though I really did try my best with the hand tools at my disposal. Eventually, I somehow managed to put together a pair of legs that functioned adequately, but they each wobbled a bit (one more than the other), and I had to fix them…

That’s when things got even more stressful. Since none of the pieces, neither apart nor put together, have flat, level, or straight sides, I couldn’t easily determine what was causing the wobble. I’d identify a raised surface that needed to be shaved down to bring it to flat, I’d shave it down carefully, but then it would wobble even more. So then I’d think maybe I’m shaving down the wrong area or corner, so I’d work on the other side, and go even further to compensate for my earlier error on the opposite side, but then it would turn out even worse still.
It was hell.
I eventually managed to get one leg to sit flat (though definitely not level), but I wore down the front foot of the other leg so much that I had to glue another piece of wood to it. Thankfully, I had some thin pieces of a soft wood for Japanese Kumiko that I’d never used that worked perfectly for this. But then that added piece still needed shaping for the leg to sit flat…I worked on it a bit, until I saw that I was yet again making things worse. Three corners of the front foot seemed to make contact with the desk, so I decided that having one raised point had to be acceptable (you can see the added piece of Kumiko wood, with its grain running in a different direction, and the raised corner in the bottom left photo in the image below, on the leg on the left).
Did I leave things there?
Of course not.
Next I thought that perhaps I should paint them! I did that, in some kind of light blue I mixed up, and hated how they looked. So then I had to get out my orbital sander to take off as much of the paint as I could. I didn’t even take photos of this part because the paint looked horrible.
Back to that second leg, even though I knew that it wouldn’t wobble once the MIDI controller’s weight was on it, I still couldn’t accept leaving things as they were. But wanting to spare myself the torment of another round of trial and error, heavy on the error, and having pretty much reached my limit of giving a sh*t at this point, and seeing that these legs were already wonky as heck, I told myself that even a crude solution was a solution nonetheless. So, instead of shaving down the raised surfaces, I glued a piece of shim to fill in the gap they created, taking care of any instability issues I might worry about.
The legs now being wobble-free, and the sanding poorly but sufficiently done, I taped some non-slip material on the top surfaces and glued some cork to the bottom of the back feet as final touches (the front feet sit on my desk mat, so I don’t need to worry about them scratching or denting my desk). I also added two tiny dot stickers on the front of my controller below the keys, to indicate the best placement for the legs when in use.
It was at this point that I finally called this project complete. Phew!
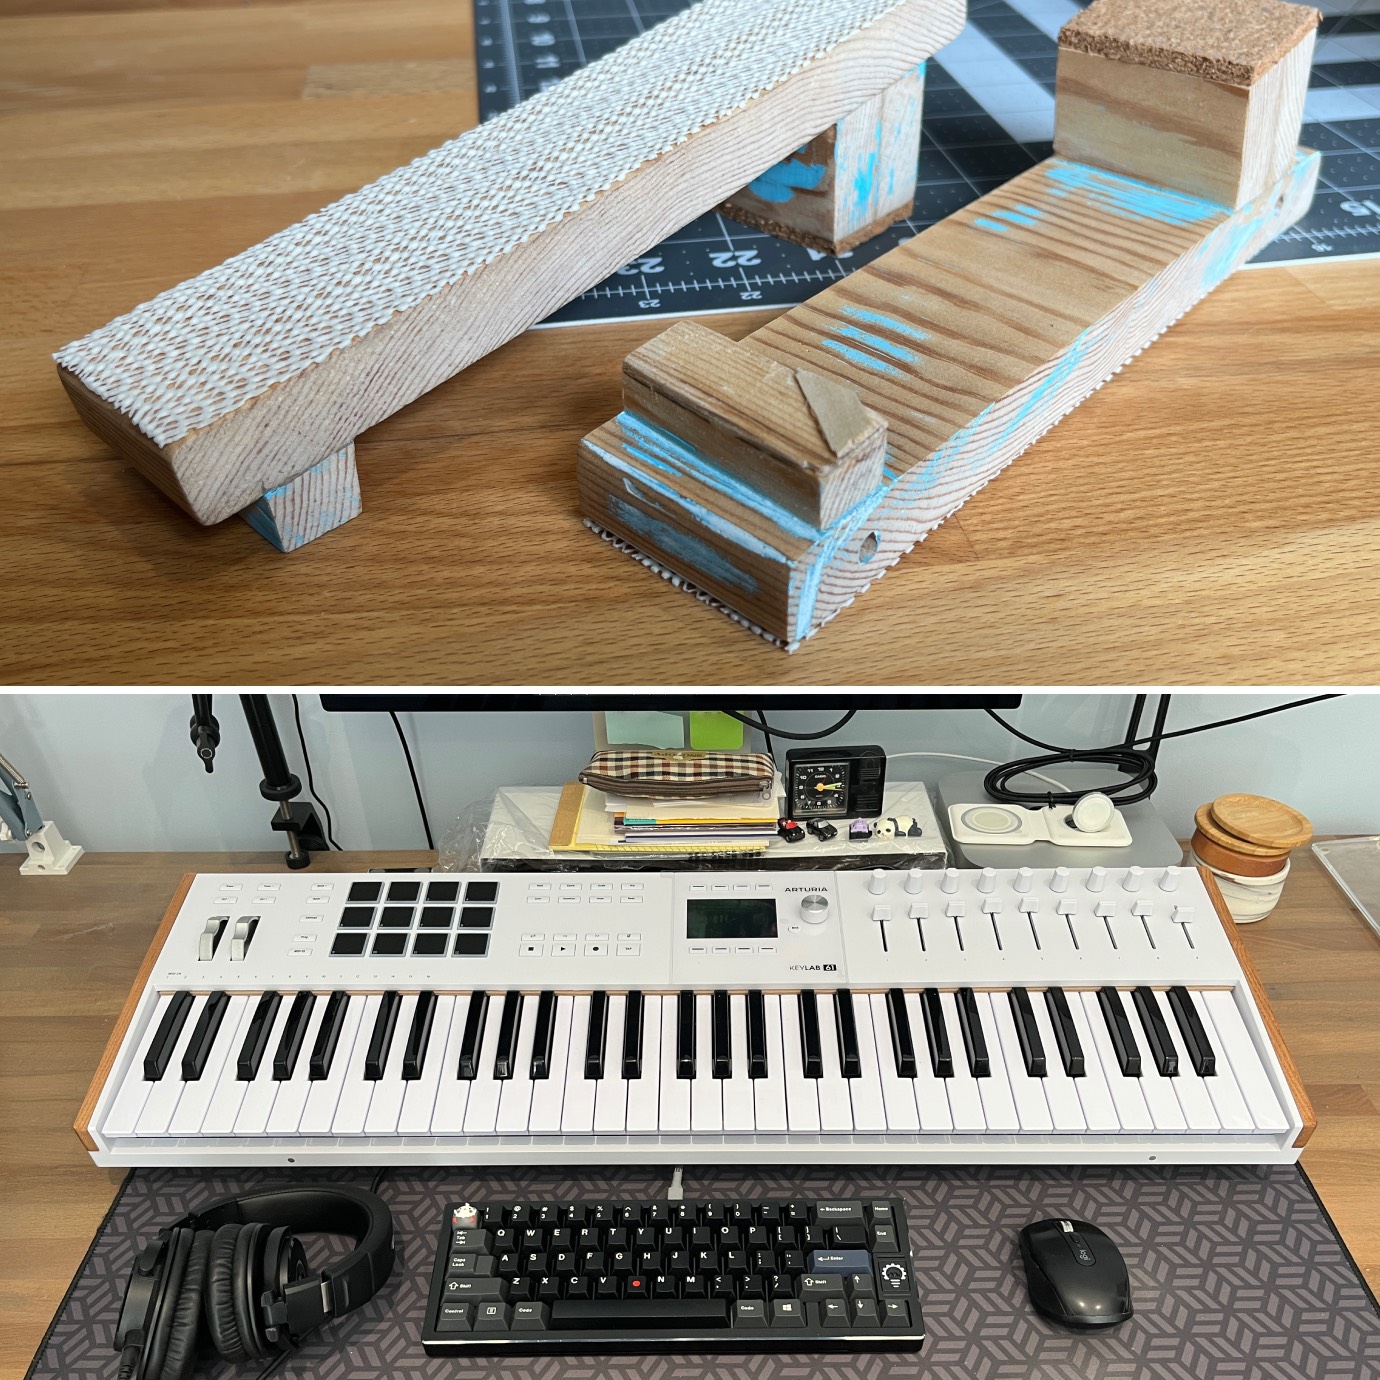
Though they are imperfect in every way you can possibly imagine, they are holding up my controller just fine, and I have grown to adore my pair of very wonky MIDI supports.
As for the digital music that this setup was meant to help me create, it is coming along nicely. Though I’m still making adjustments to them, I’ve composed a few simple piano pieces that I am very proud of, and may share them here when the time comes. Stay tuned—pun intended!