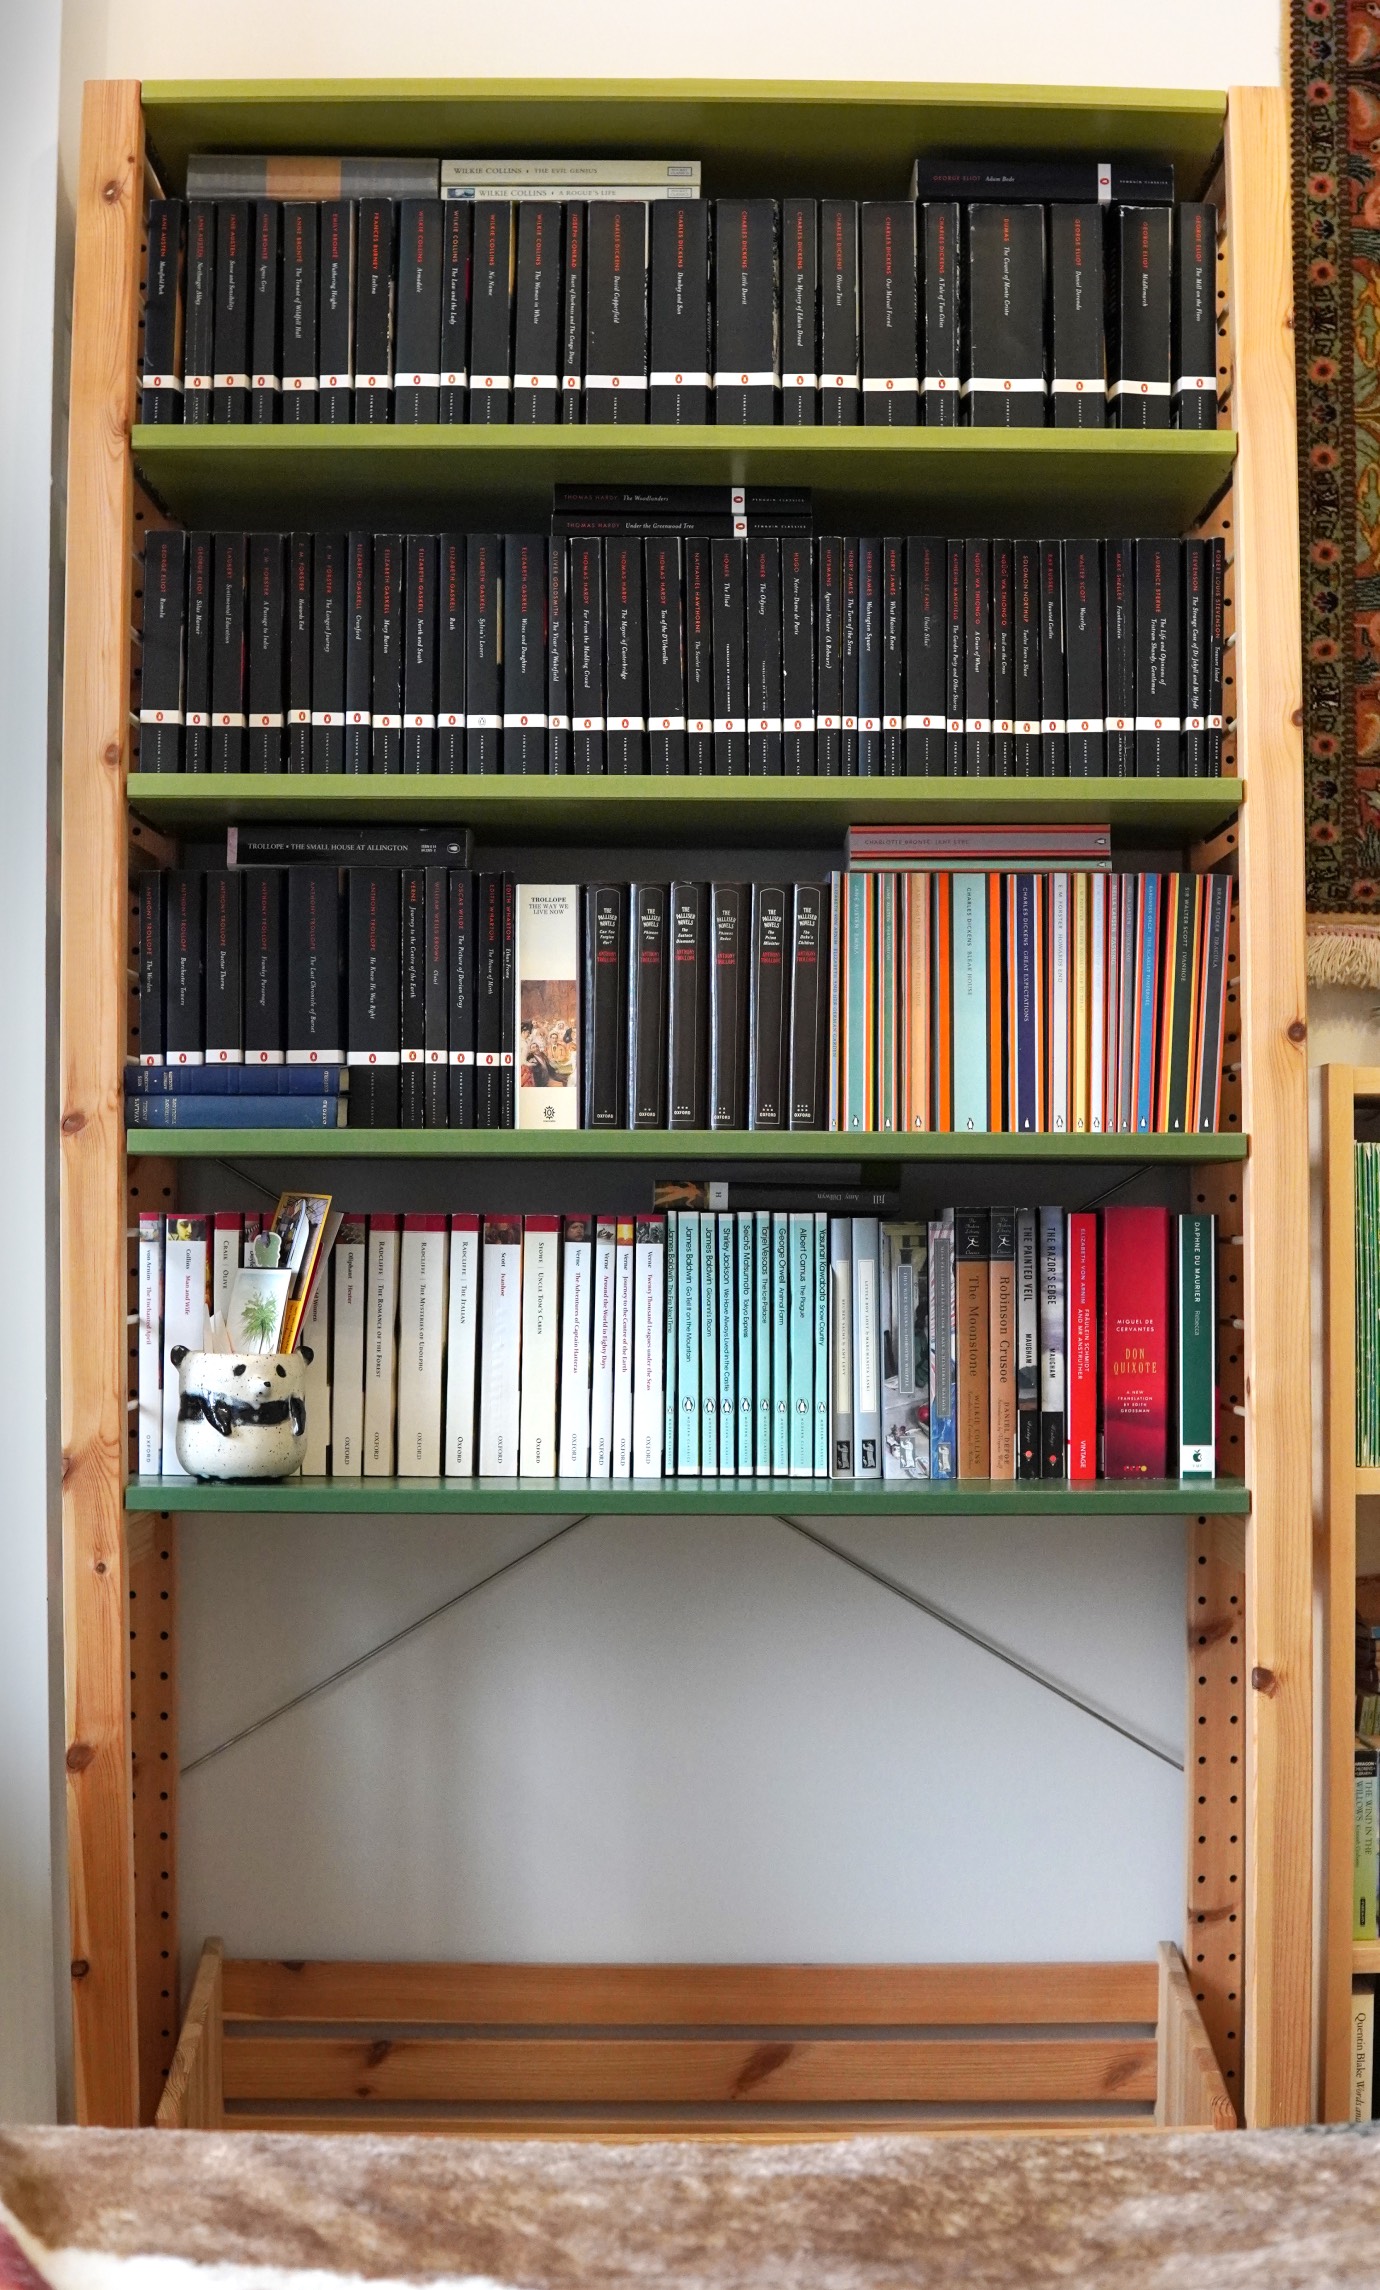
Before this past summer, I had one main bookshelf area in my bedroom to hold my fiction books: a series of wall-mounted shelves that I put up myself a few years ago. But as I was rapidly acquiring and amassing my collection of classics over the past few months, I knew that I would have no room on those shelves to place them, and I also wanted to give them their own space where their uniformity could be showcased.

I happened to have an IKEA IVAR shelf unit that I wasn’t using efficiently, so I cleared it, painted the shelves (using leftover wall paint samples I had purchased years a while ago), finished them with polycrylic, and started organizing my classics collections there. However, if you’re familiar with the IKEA IVAR series, those shelf units are made up of basic frames and shelves without any solid back or side panels.
This meant I had to combine the stacking of books and the use of bookends to keep my books in place, and I couldn’t go to the edges of the shelves either, wasting precious shelf space in the process. It didn’t take long for me to find this inconvenient and annoying, as every time I wanted to add a book or move them around, I had to first shift the book stacks or remove the bookends carefully while making sure the standing books stayed put, otherwise they’d immediately topple over, often falling out the open sides of the shelves.
Then, after coming back from my “Book Voyaahge” with a whole bunch of additional books to add to the mix, I started to wonder if I might need to replace that IVAR unit with something more book-friendly.
But as I was adjusting the shelves one day, requiring one to reposition the pegs that support them, a simple solution to end my woes came to mind. I realized that I could insert rods across the vacant peg holes that run down the IVAR frames to act as (book) barriers!
Wasting no time, I measured the diameter of the holes and headed to a nearby Canadian Tire to purchase some wooden dowels that I remembered seeing there on a previous visit. IKEA’s measurements are metric, and the holes are made to accommodate 6mm pegs. The dowels at the store were in imperial increments, and 1/4″ (6.35mm) was the closest size I could get to that. Though slightly too thick, they’d be perfect with some minor modification.
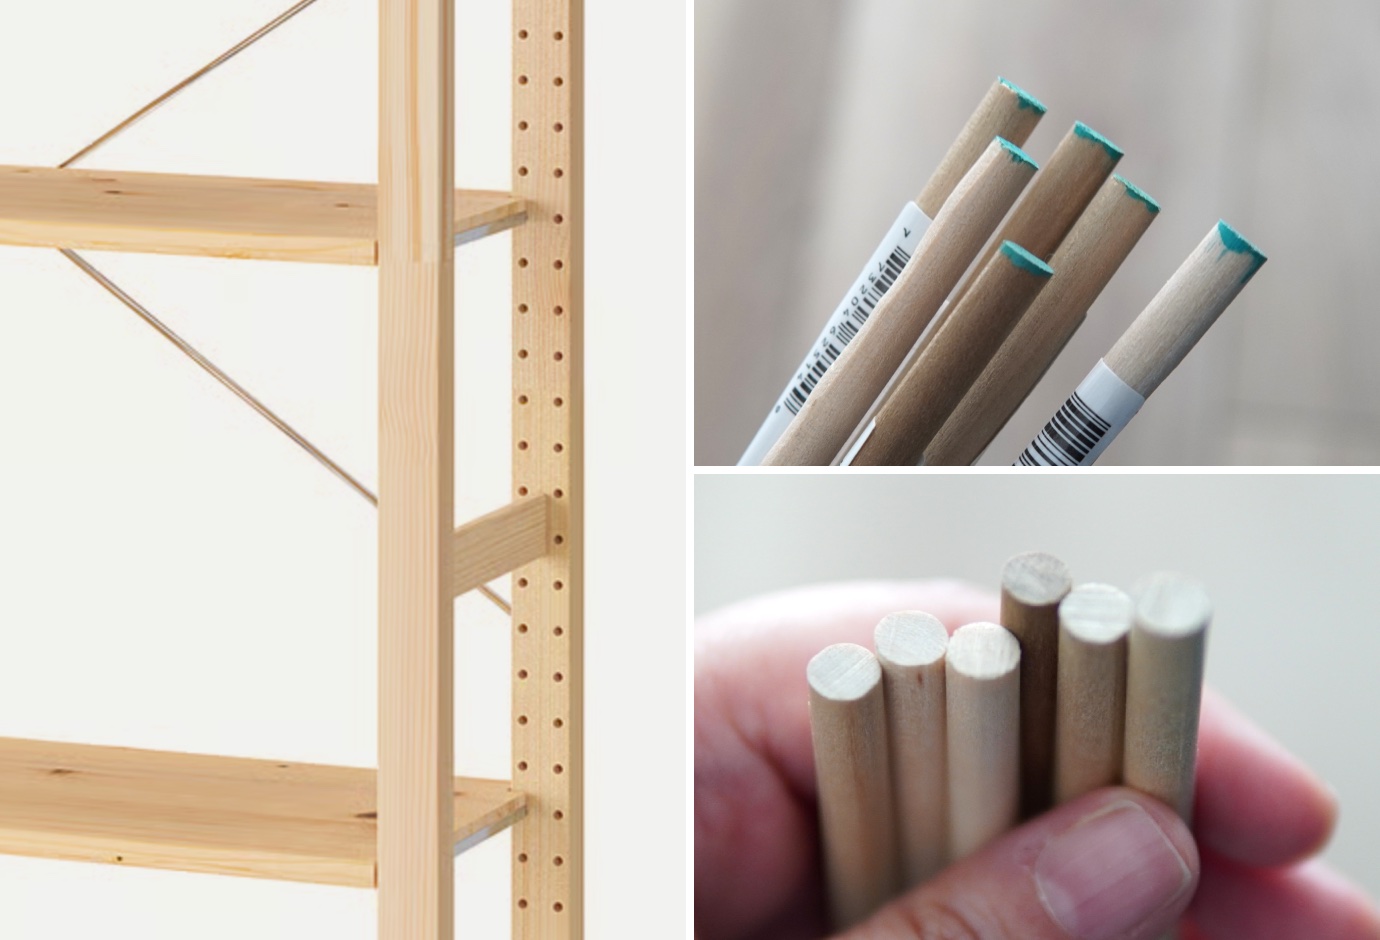
Back at home, I measured the depth of the peg holes (1″) as well as the inner distance between the front and back legs of the side frame (9.25″) to give me the length for the rods I’d require. I was feeling motivated to just get things done, so without giving my process much thought I placed a cardboard box that I had nearby on my desk to lift my work area and give me room to cut down the dowels, which I did using a small Japanese flush cut saw. The dowels I had purchased were 36″ long, and each one yielded three 10.25″ rods.
As I was nearing the completion of this impromptu task, it occurred to me that I’ll likely want to write about this mini project and should visually document my steps. Thankfully, I managed to do that just before sawing my last dowel.

The next step was to sand down the ends of the rods so that I could fit them inside the holes. I used regular sand paper at first, and that did work, but it was tiring and awkward on such a small area. I then remembered the Dremel set that I’d purchased a couple of summers ago, that I hadn’t even opened yet, and figured now would be the perfect time to put it to use.
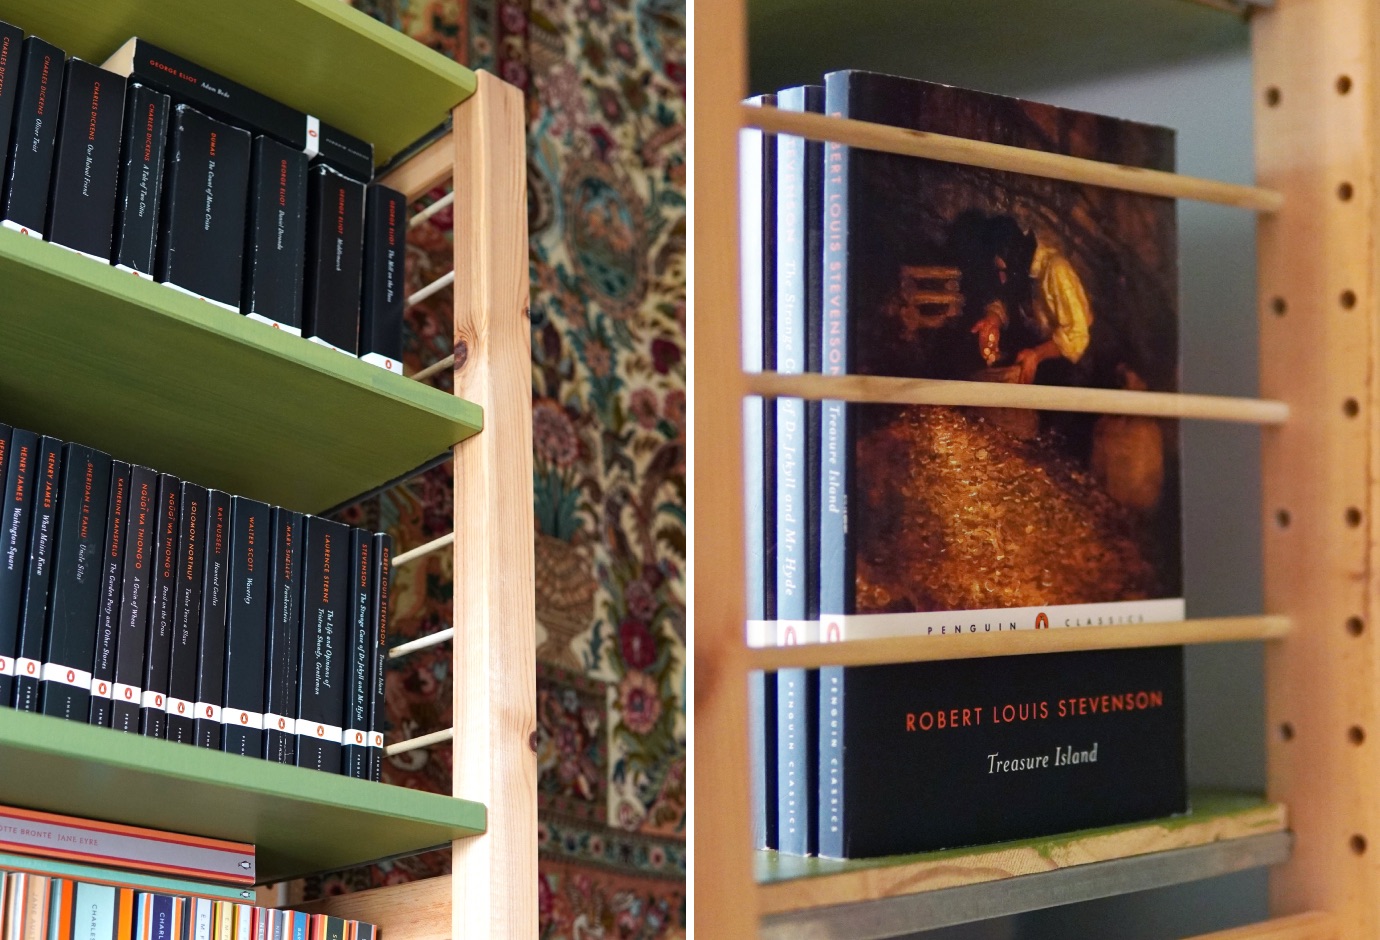
So, I sanded down both sides of each rod, going in about 3/4″–1″ from the ends (I mainly just eyeballed this distance) to make sure that I could slide the rods all the way into one hole and then pull them out a bit to fit into the corresponding hole on the opposite side of the frames.

Knowing how much to sand down was a bit tricky. I didn’t want to sand too much and have the rods be too loose in their pockets, but I didn’t want the fit to be too tight either so that I could slide them out easily at any time. I also figured the rods would need room to expand a bit in the summer months. This process, done over the bathtub to contain the wood dust I knew it would generate, consisted of a lot of back and forth of doing some sanding then going to the bookshelf to test the fit, then returning to take a bit more off if needed.
When I was done, I played around with different combinations of placements for the rods, such as two at the bottom and one toward the the top, or two at the bottom and one in the middle, but landed on spreading them out evenly across the height between the shelves. Of course, I then spent quite a while re-organizing my books as well, because I could now, unlike before, make use of the entire width of each shelf.
And that’s it! Such a simple and accessible solution to optimize the bookshelf that houses my classic book collection. I am thrilled with the end result. I like the raw look of the rods, as they match the frames, but I might paint them one day…maybe in various greens like the shelves, or maybe black to match the Penguin Classics, or maybe I’ll go wild and do all kinds of rainbow colours.